

Yes, you may think: “What? Google Cloud has it’s own load balancer managed service. Why you want to configure and manage a dedicated HA load balancer?“. We recommend using GCP Load Balancer service always as you can. It’s a very reliable service and you don’t have to manage your own load balancer in a High-Availability configuration.
But sometimes there are some situations that the GCP Load Balancer doesn’t fit your needs or, simply you don’t want to use it… In those cases we have a very simple configuration using two well known pieces of software: HAProxy and Keepalived.
Keepalived uses Virtual Router Redundancy Protocol (VRRP) and floating IP addresses that can ‘move’ from one VM to another in case of one of them becomes unavailable. In a classic and on-prem environment this is something like that:

In case of a server failure, when the other server takes over the floating IP addresses, it adds these addresses to its network interface. The server announces this takeover to other devices using Layer 2 by sending a gratuitous Address Resolution Protocol (ARP) frame. Google Compute Engine uses a virtualized network stack and typical implementation mechanisms don’t work here. The VPC network handles ARP requests based on the configured routing topology, and ignores gratuitous ARP frames.
First of all, you need to install haproxy and keepalived in your server. In this case, we used Ubuntu 18.04. Just run:
sudo apt install haproxy
sudo apt install keepalived
For this tutorial we will configure an internal load balancer but you can also configure an external load balancer with some small modifications.
We’ll use this /etc/haproxy/haproxy.cfg file in both servers. Both servers (MASTER and BACKUP) need to have exactly the same HAProxy configuration.
global
        log /dev/log    local0 debug
        log /dev/log    local1 debug
        chroot /var/lib/haproxy
        stats socket /run/haproxy/admin.sock mode 660 level admin expose-fd listeners
        stats timeout 30s
        user haproxy
        group haproxy
        daemon
defaults
        log     global
        mode    http
        option  dontlognull
        timeout connect 5000
        timeout client  50000
        timeout server  50000
        errorfile 400 /etc/haproxy/errors/400.http
        errorfile 403 /etc/haproxy/errors/403.http
        errorfile 408 /etc/haproxy/errors/408.http
        errorfile 500 /etc/haproxy/errors/500.http
        errorfile 502 /etc/haproxy/errors/502.http
        errorfile 503 /etc/haproxy/errors/503.http
        errorfile 504 /etc/haproxy/errors/504.http
frontend service-1
  bind 192.168.240.140:443
  mode tcp
  option tcplog
  log global
  default_backend service-1-be
backend service-1-be
  mode tcp
  server service-1-server-1 10.152.0.220:443 check id 1
server service-1-server-2 10.152.0.221:443 check id 2
frontend service-2
  bind 192.168.240.141:443
  mode tcp
  option tcplog
  log global
  default_backend service-2-be
backend service-2-be
  mode tcp
  server service-2-server-1 10.10.0.40:443 check id 1
server service-2-server-2 10.10.0.41:443 check id 2
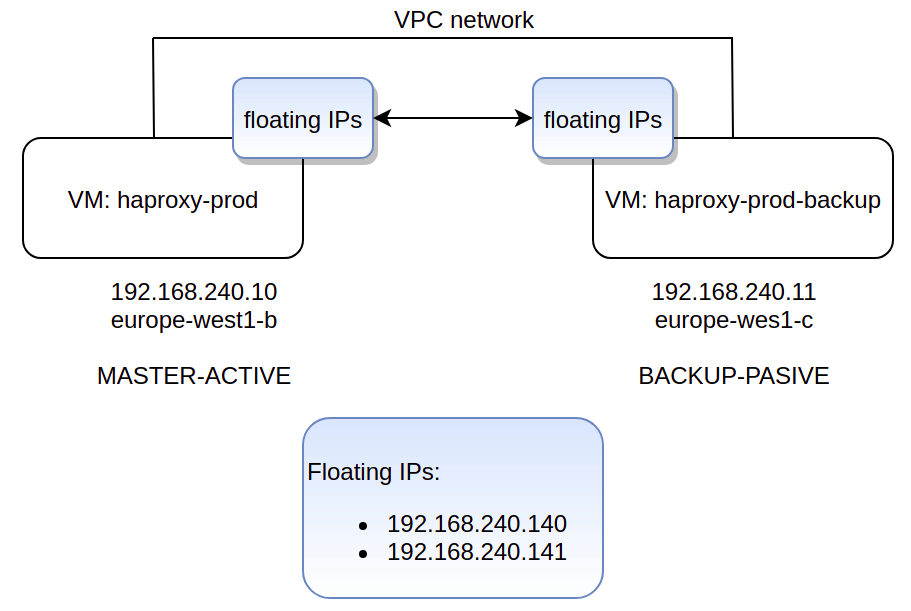
In this example, the two floating IPs will be: 192.168.240.140 and 192.168.240.141.
Don’t forget to restart the haproxy service(sudo systemctl restart haproxy) every time you change the config file. 😉
For the /etc/keepalived/keepalived.conf configuration file we will use these two config files in the master and slave VMs:
MASTER
vrrp_instance floating_ip {
    state MASTER
    interface ens4
    unicast_src_ip 192.168.240.10
    unicast_peer {
        192.168.240.11
    }
    virtual_router_id 50
    priority 100
    authentication {
        auth_type PASS
        auth_pass your_passwd
    }
    notify_master /etc/keepalived/takeover.sh root
}
BACKUP
vrrp_instance floating_ip {
    state BACKUP
    interface ens4
    unicast_src_ip 192.168.240.11
    unicast_peer {
        192.168.240.10
    }
    virtual_router_id 50
    priority 50
    authentication {
        auth_type PASS
        auth_pass your_passwd
    }
    notify_master /etc/keepalived/takeover.sh root
}
Don’t forget to restart the keepalived service (sudo systemctl restart keepalived) every time you change the config file. 😉
And now the part that does the ‘magic’: the /etc/keepalived/takeover.sh script. Basically, this script unassigns IP aliases from the peer that is down and assigns them to himself. After that, haproxy service is reloaded to allow haproxy to bind to the floating IPs.
MASTER
# Unassign peer's IP aliases. Try it until it's possible.
until gcloud compute instances network-interfaces update haproxy-prod-backup --zone europe-west1-c --aliases "" > /etc/keepalived/takeover.log 2>&1; do
    echo "Instance not accessible during takeover. Retrying in 5 seconds..."
    sleep 5
done
# Assign IP aliases to me because now I am the MASTER!
gcloud compute instances network-interfaces update haproxy-prod
    --zone europe-west1-b
    --aliases "192.168.240.140/32;192.168.240.141/32" >> /etc/keepalived/takeover.log 2>&1
systemctl restart haproxy
echo "I became the MASTER at: $(date)" >> /etc/keepalived/takeover.log
BACKUP
# Unassign peer's IP aliases. Try it until it's possible.
until gcloud compute instances network-interfaces update haproxy-prod --zone europe-west1-b --aliases "" > /etc/keepalived/takeover.log 2>&1; do
    echo "Instance not accessible during takeover. Retrying in 5 seconds..."
    sleep 5
done
# Assign IP aliases to me because now I am the MASTER!
gcloud compute instances network-interfaces update haproxy-prod-backup
    --zone europe-west1-c
    --aliases "192.168.240.140/32;192.168.240.141/32" >> /etc/keepalived/takeover.log 2>&1
systemctl restart haproxy
echo "I became the MASTER at: $(date)" >> /etc/keepalived/takeover.log
In fact, all that we do is assign/unassing IP alias depending on what VM is the MASTER.
Easy, isn’t it? 🙂
I hope you’ve enjoyed this post and I encourage you to check our blog for other posts that you might find helpful, such as “What is the cloud?“. Do not hesitate to contact us if you would like us to help you on your projects.
See you on the next post!