

Recently, a vulnerability has been detected in Gitlab that affects the following versions:
- 13.10.3
- 13.9.6
- 13.8.8
It may happen that we have some Gitlab even older than these versions, then we will have to update it to the most recent version through several intermediate versions.
Next, we will show the steps to update Gitlab on Ubuntu 18. We will start with the gitlab-ee 12.7.5-ee example and take it to version 14.4.2-ee.
We consider that Gitlab is previously installed from the official repository with its embedded postgresql and redis services.
Previous steps
If we are working in the Cloud and we have our Gitlab installed on an EC2 instance, it is recommended to create an image of the instance and clone it into a new one to perform these migration steps.
We will also need access to the Linux console of that instance and have root permissions.
Updates + snapshots
We execute the following <apt install> commands in sequence, expecting in each case that they do not give us any error and they end correctly.
sudo apt install gitlab-ee=12.10.14-ee.0
sudo apt install gitlab-ee=13.0.14-ee.0
sudo apt install gitlab-ee=13.1.11-ee.0
sudo apt install gitlab-ee=13.8.8-ee.0
sudo apt install gitlab-ee=13.12.10-ee.0
sudo apt install gitlab-ee=13.12.12-ee.0
Once these steps are finished, we will have to execute the following command in the console, since gitlab needs to migrate its existing projects to the newe hashed_storage system that the following versions use.
sudo gitlab-rake gitlab:storage:migrate_to_hashed
At the end of the previous command, we must restart the instance and reconnect to it.
At this point we have Gitlab 13.12.12
Let’s continue with the updates
sudo apt install gitlab-ee=14.0.11-ee.0
At the end of this step, we must verify that all migrations have completed successfully.
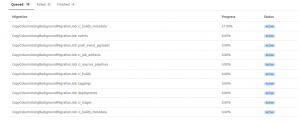
Starting with this version, Gitlab provides us with a new tool that allows us to see if migrations are running. We must check that there are none in the queue and that all have finished without errors.
We find this tool in: administration>monitoring>Background Migrations.
In addition, we will also check on administration>monitoring>healthCheck that Gitlab is in a “Healthy” state.
At the end of this step, it is recommended to take a snapshot.
We will continue with the following sequence of updates
At the end of each one, we will repeat the exercise of checking for each completion, Background Migrations
sudo apt install gitlab-ee=14.1.6-ee.0
sudo apt install gitlab-ee=14.2.0-ee.0
sudo apt install gitlab-ee=14.2.6-ee.0
sudo apt install gitlab-ee=14.3.0-ee.0
sudo apt install gitlab-ee=14.3.4-ee.0
sudo apt install gitlab-ee=14.4.0-ee.0
sudo apt install gitlab-ee=14.4.2-ee.0
Another important tip to know is that in some versions, prior to 14, we will see that the apt command has ended, but when we try to access Gitlab we get a 502 error. This happens because there are the aforementioned Background Migrations, but for these versions not the tool existed that allowed us to observe its status. But let’s not despair because we can see the log! and observe when they are done.
We can see the last entries in the log like this and check that no running transactions are found:
sudo tail -f /varlog/gitlab/gitlab-rails/production.log
And that’s it, we’ve done it! Congratulations
I hope this article has helped you to learn something new and continue to expand your knowledge.
If you need information about the DevOps world, I invite you to contact us and keep checking our blog to find other useful publications.
Until next time!👋
→ Post written by Christian Tagliapietra and Álvaro Abad.