

Dynamic nodes in Jenkins via AWS Spot Fleet
Provisionar nodos slave de jenkins dinámicamente gracias a aws spot fleet
A few weeks ago, a customer contacted us. His request was simple: What can we do to further optimize our automated CI/CD process in Jenkins?
After assesing the needs and the current infrastructure of the client, we decided to change the current paradigm in terms of task execution. Until now Jenkins executed the tasks in its main node (the machine where Jenkins is running), by changing this paradigm to one based on dynamic provisioning of subordinate nodes we would gain the following benefits:
- Cost savings – By moving all the computational effort away from the main node. It can be hosted on a lower performance machine, reducing the overall cost of our infrastructure. The subordinate nodes would only be running during the execution of a task, also saving money while no task is running.
- Security – As we will not execute any code on the main node, we ensure the system’s integrity even if the code has been compromised, and since it is only executed on an ephemeral instance the attacker will be isolated.
- Performance – The subordinate node exists only to execute the task and can dedicate all of the node’s resources to it.
Requirements
For this change, we will perform the following tasks:
- Spot Fleet creation in AWS
- Installation and configuration of the Jenkins plugin
- Jenkinsfile adaptation
For this publication we will make the following assumptions:
- We have an AWS account already set up
- We host Jenkins on an EC2 server
- We have knowledge of some basic Jenkins and AWS concepts
That said, let’s get down to business.
In this article on “Dynamic nodes in Jenkins via AWS Spot Fleet” we will develop all the necessary steps to obtain a good result.
Creation of launch template and spot fleet
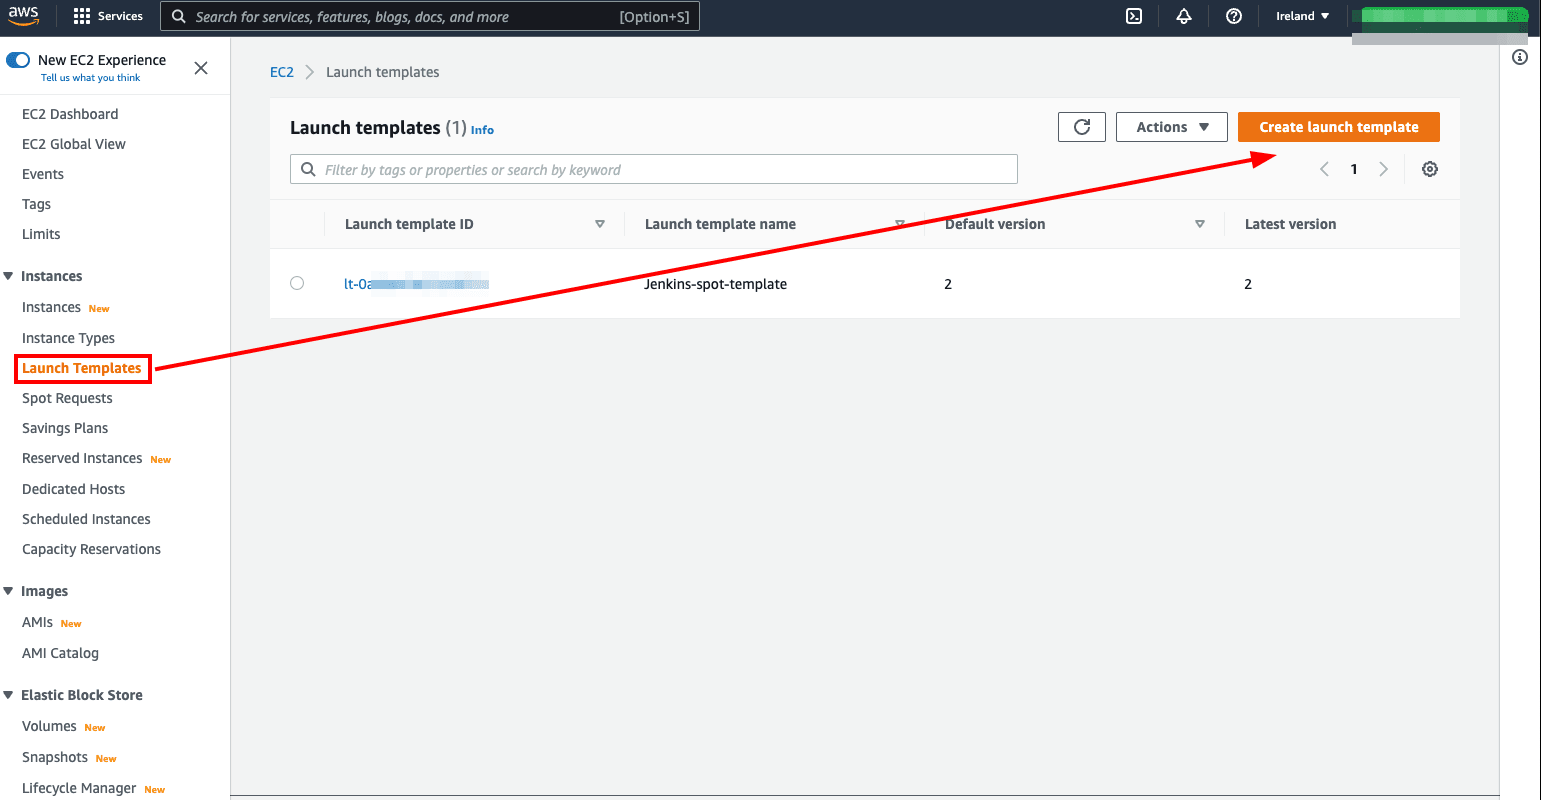
An AWS Spot Fleet is nothing more than an AutoScaling Group of EC2 machines but with spot type instances – Amazon’s surplus hardware that nobody is using and that AWS sells cheaper than usual. The first step will be to create the Launch Template that the Spot Fleet will use:
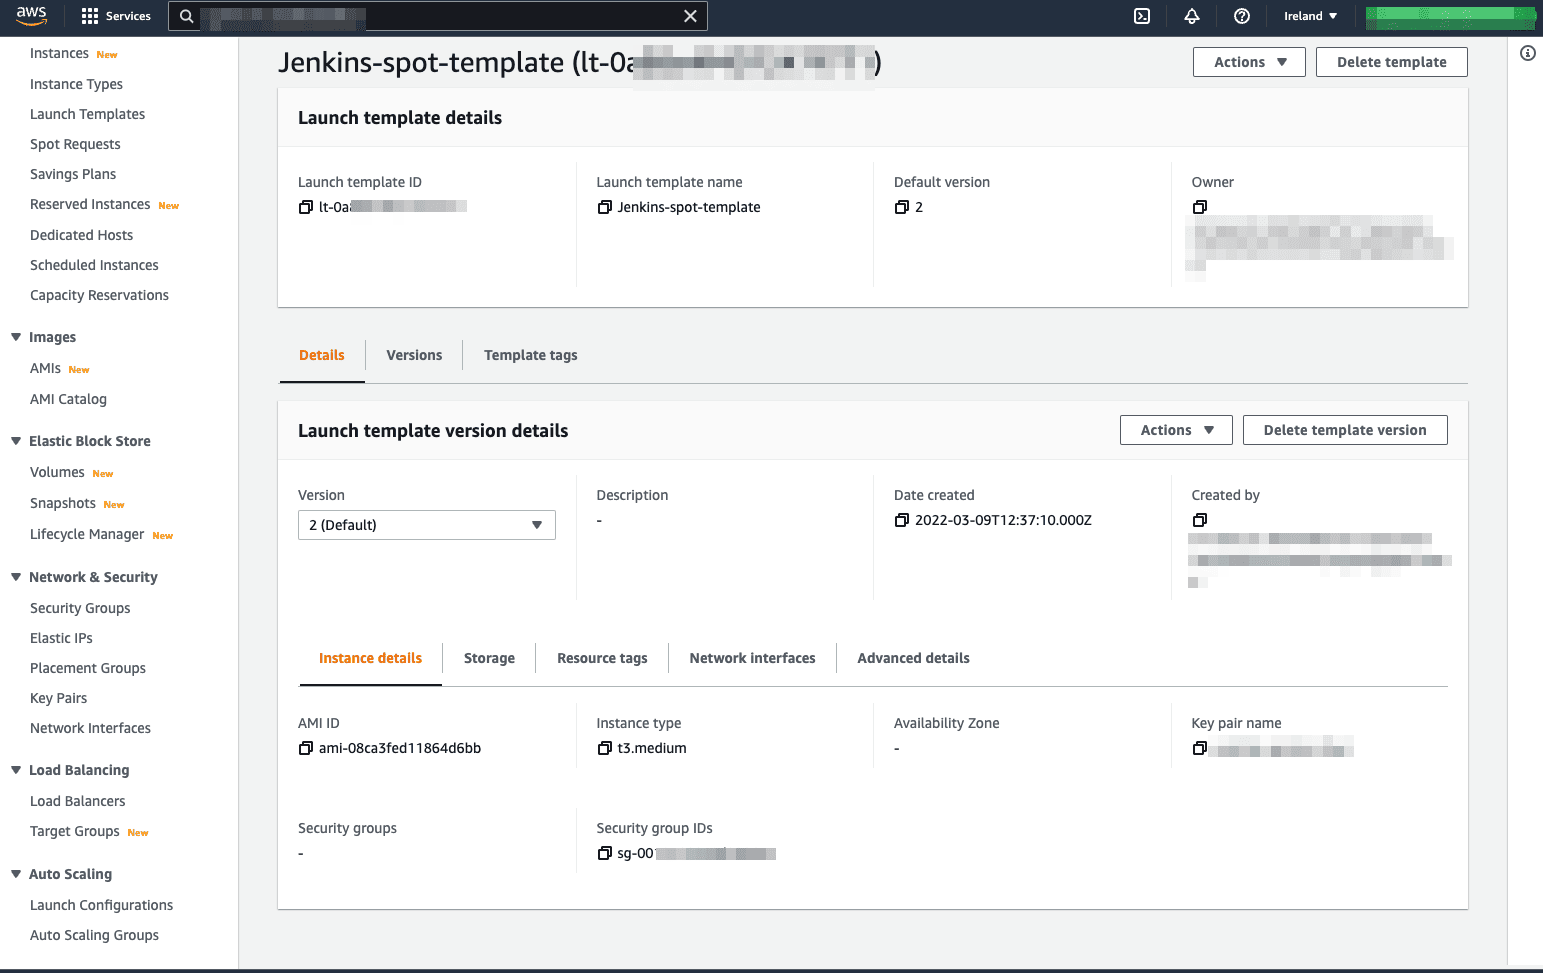
The important items to be filled in will be:
- Name and description
- AMI to use – For example Ubuntu 22
- Type of instance to use – Choose one according to your performance needs
- Key Pair – We will need to add it later in Jenkins
- Network – Use the same Subnet as Jenkins if possible
- Security Group – For the connection between nodes to be established, it is important that we give access to port 22 from the main node. The easiest way is to create a rule that allows access either from the IP of the main node (if we have a Elastic IP assigned) or from its Security Group
- Storage – Allocate the storage according to your needs
- User data – For the Jenkins worker to run on the subordinate node, we will need to install JRE, we also installed Docker as a requirement:
#!/bin/bash
# Install docker
apt-get update
apt-get install -y apt-transport-https ca-certificates curl software-properties-common
curl -fsSL https://download.docker.com/linux/ubuntu/gpg | sudo apt-key add -
add-apt-repository \
   "deb [arch=amd64] https://download.docker.com/linux/ubuntu \
   $(lsb_release -cs) \
   stable"
apt-get update
apt-get install -y docker-ce
usermod -aG docker ubuntu

# Install docker-compose
curl -L https://github.com/docker/compose/releases/download/1.21.0/docker-compose-$(uname -s)-$(uname -m) -o /usr/local/bin/docker-compose
chmod +x /usr/local/bin/docker-compose

#Install JRE
sudo apt install -y default-jre
Once created we will have a Launch template similar to this one:
Now it is time to create the Spot fleet as such:
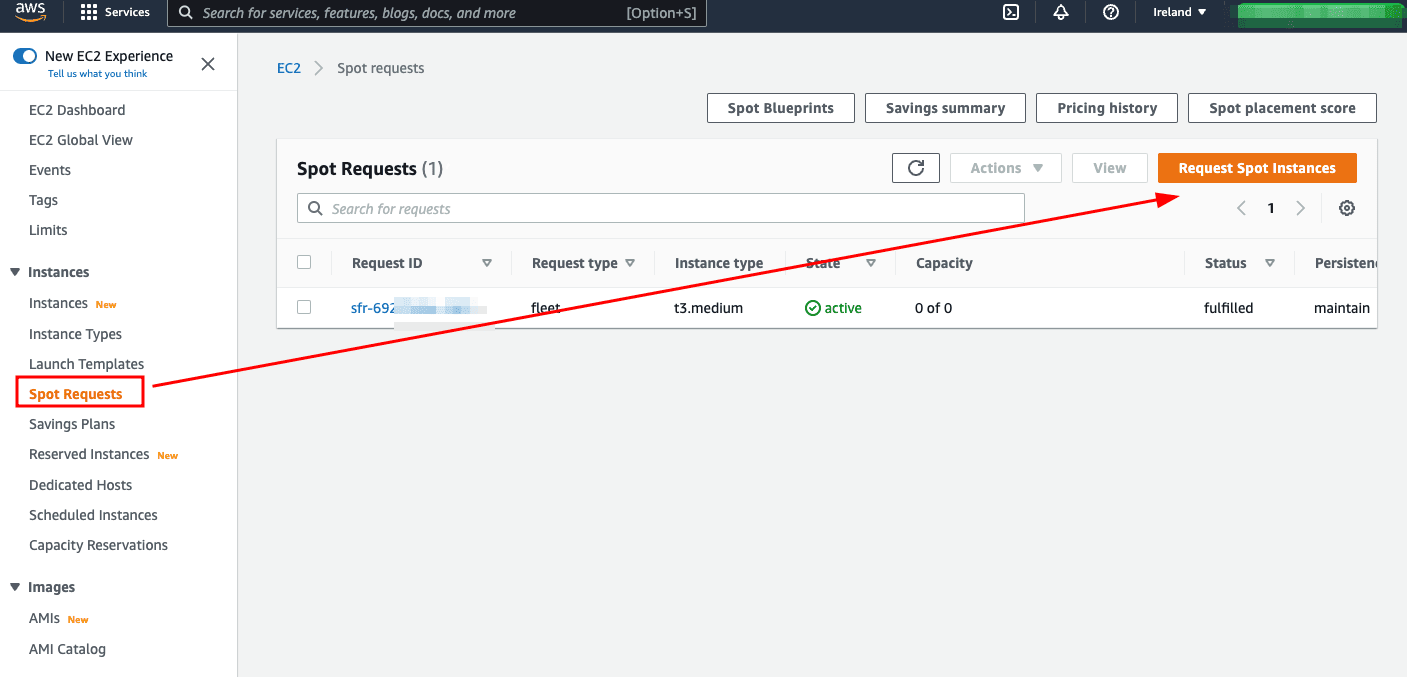
In this case, the items to be filled in are:
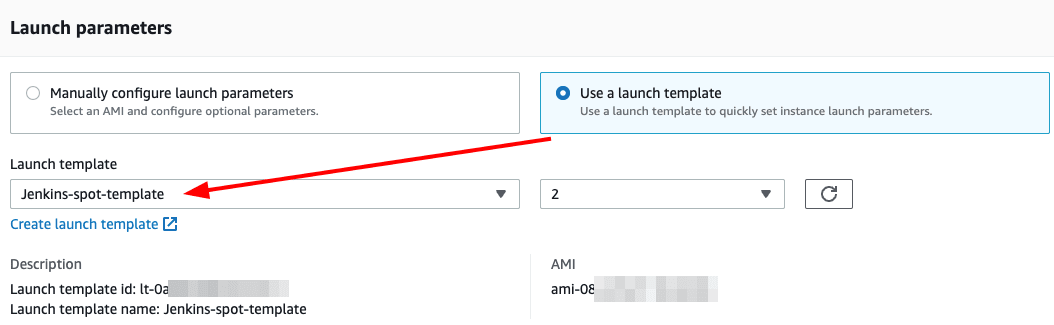
- Launch parameters – Select our Launch Template created above
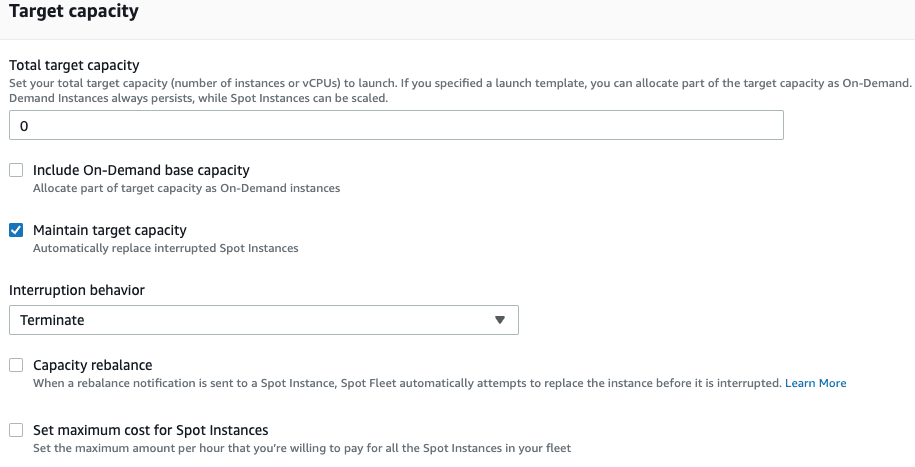
- Target Capacity – Set total to 0 for now, as it will be controlled by the Jenkins plugin. Enable Maintain Target Capacity
- Network – Assign the VPC in which the main node is hosted
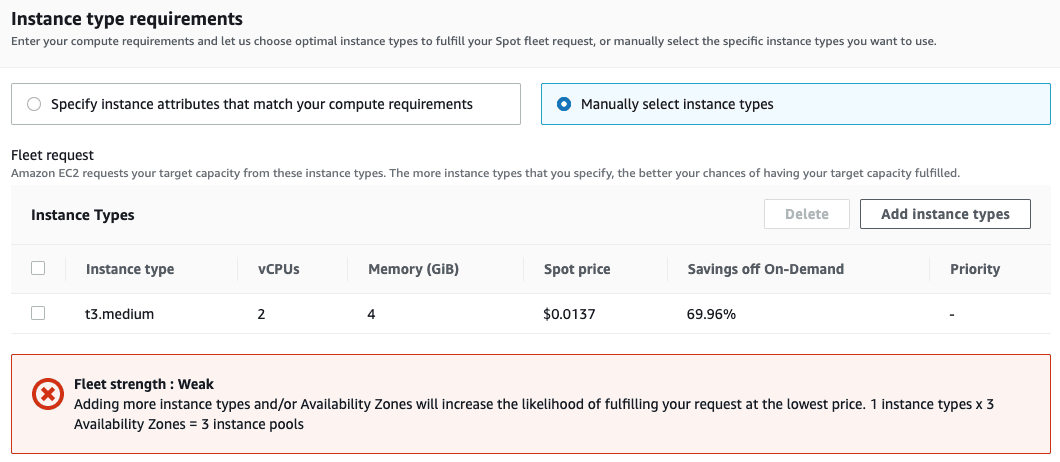
- Instance type requirements – Choose the desired instance types in Manually select instance types, a larger quantity gives a better pool from which to start Spot instances
- Allocation strategy – Capacity Optimized
And that’s it, we have created our Spot Fleet.
Installing and configuring the Jenkins plugin
Before installing the plugin, we will have to create and assign a new IAM role to the instance hosting the main node so that it will be able to manage our Spot fleet:
{
   "Version":"2012-10-17",
   "Statement":[
      {
         "Effect":"Allow",
         "Action":[
            "ec2:DescribeSpotFleetInstances",
            "ec2:ModifySpotFleetRequest",
            "ec2:CreateTags",
            "ec2:DescribeRegions",
            "ec2:DescribeInstances",
            "ec2:TerminateInstances",
            "ec2:DescribeInstanceStatus",
            "ec2:DescribeSpotFleetRequests"
         ],
         "Resource":"*"
      },
      {
         "Effect":"Allow",
         "Action":[
            "autoscaling:DescribeAutoScalingGroups",
            "autoscaling:UpdateAutoScalingGroup"
         ],
         "Resource":"*"
      },
      {
         "Effect":"Allow",
         "Action":[
            "iam:ListInstanceProfiles",
            "iam:ListRoles",
            "iam:PassRole"
         ],
         "Resource":"*"
      }
   ]
}
Once this is done, we will install the ec2-fleet-plugin and configure it from Manage Jenkins > Manage Nodes > Configure Clouds > Add New Cloud > Amazon EC2 Fleet.
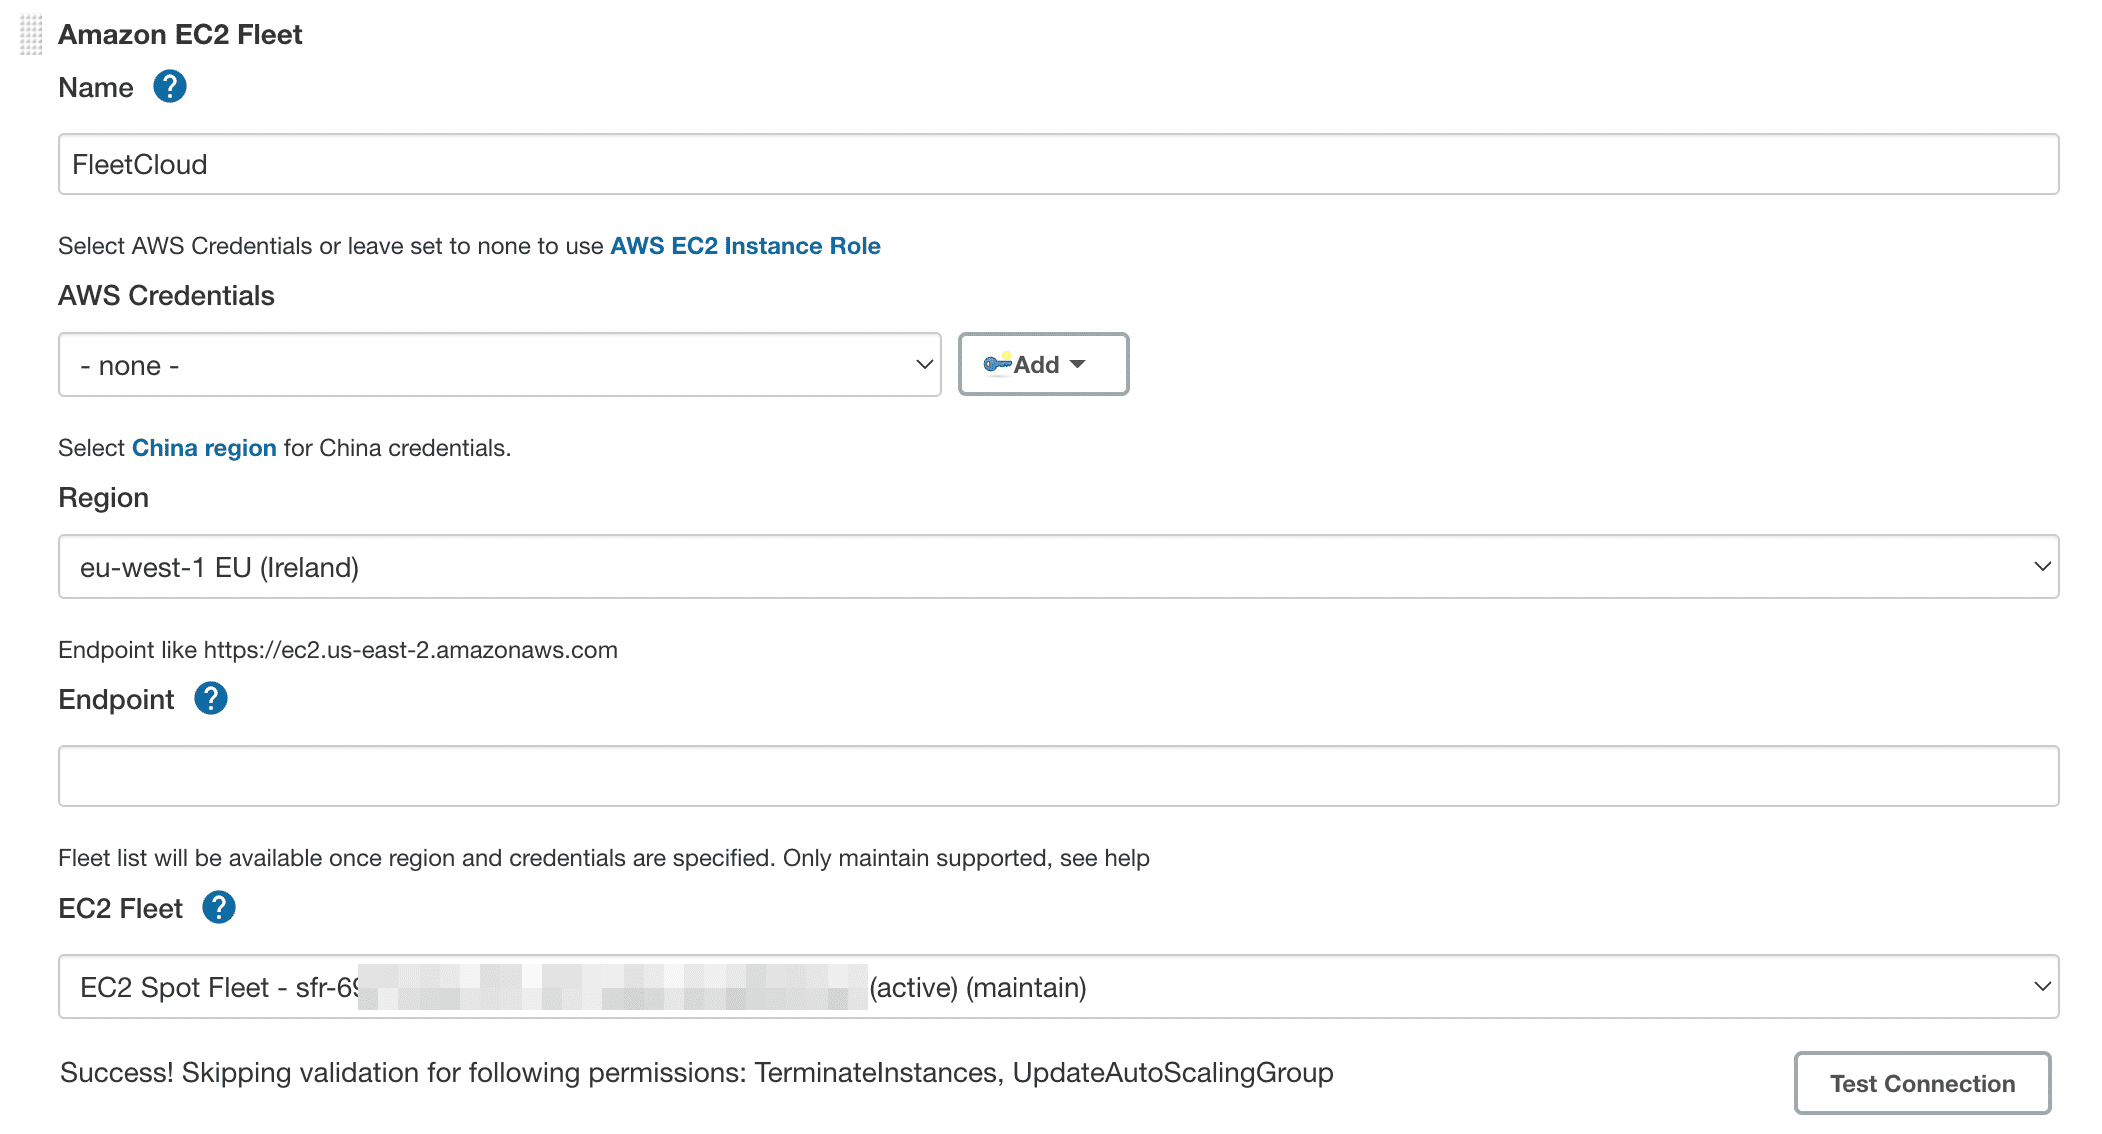
- Assign a name
- AWS Credentials – We leave this blank, since our machine already has the role described above.
- Region – Select the region in which we host our servers.
- EC2 Fleet – It will only appear when we assign the region and the role is assigned to the machine correctly. Once filled in, we select our Spot fleet
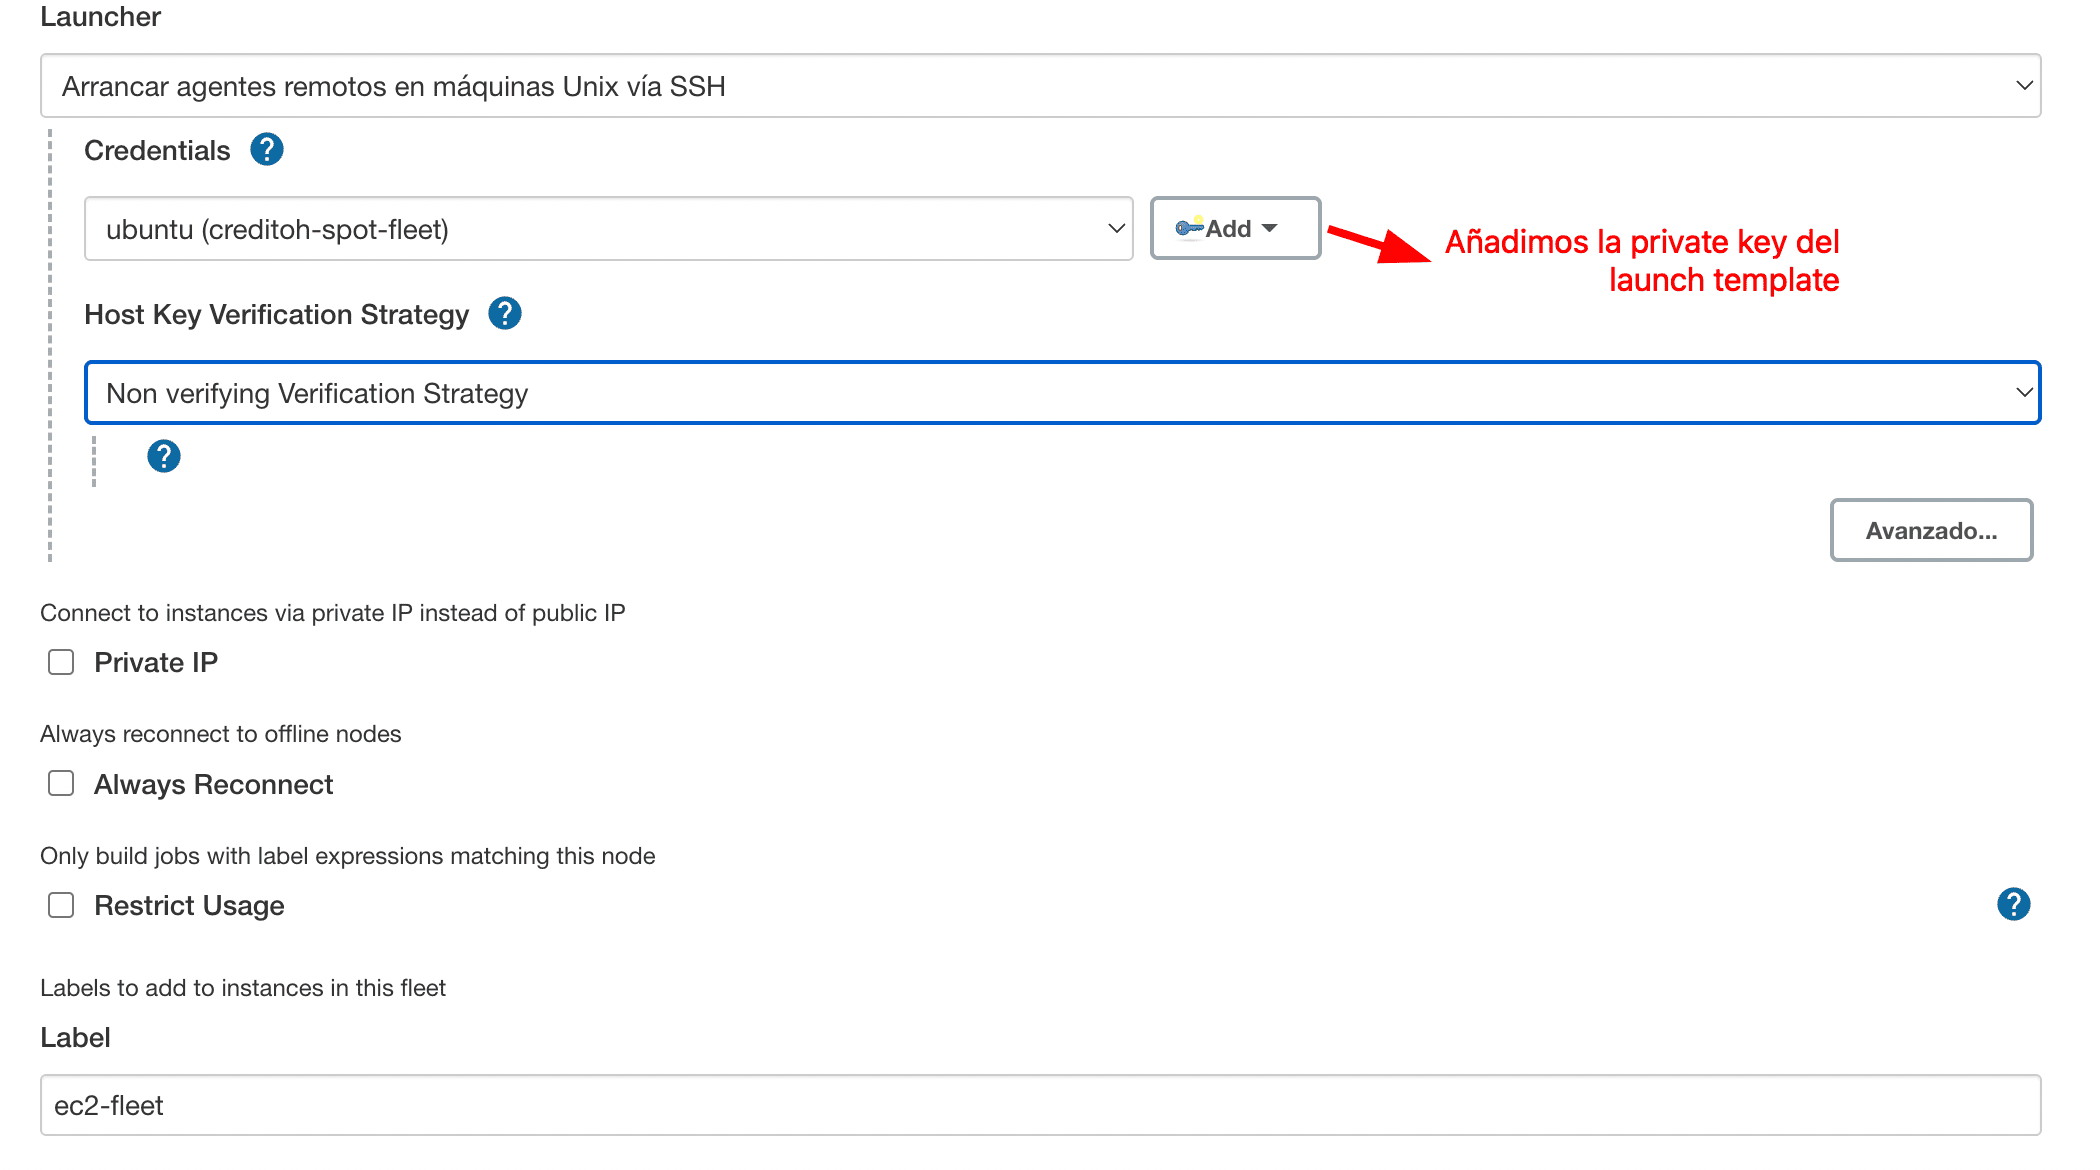
- Upload the Private key generated in the Launch template as SSH Username with private key
- Private IP – Select if we want the main node to connect to the subordinate node using the private IP instead of the public one
- Always Reconnect – We recommend not to enable it, as Spot instances are ephemeral by nature
- Restrict Usage – Restrict the use of this Spot Fleet only to tasks that specify the assigned tag, regardless of the global Jenkins configuration
- Label – The label that identifies this node cloud, useful for assigning which tasks will be executed in the Fleet

- Number of executors – The number of simultaneous jobs that each Spot Fleet instance will be able to host
- Max Idle Minutes Before Scaledown – The number of minutes Jenkins will keep an instance active with no pending tasks. If left at 0 Jenkins will never terminate instances, even if they are unused
- Minimum/Maximum cluster Size – The minimum and maximum quantity of instances we want the Spot fleet to have. Ideally, the minimum should be set to 0 to reduce costs
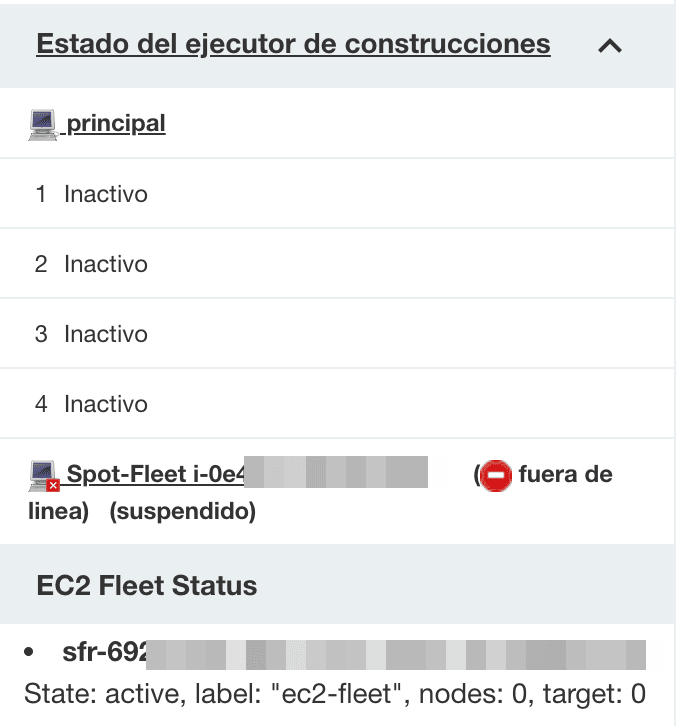
Once the configuration is saved, we will have a new section in the Jenkins dashboard, which indicates the current status of our Spot Fleet.
Jenkinsfile adaptation
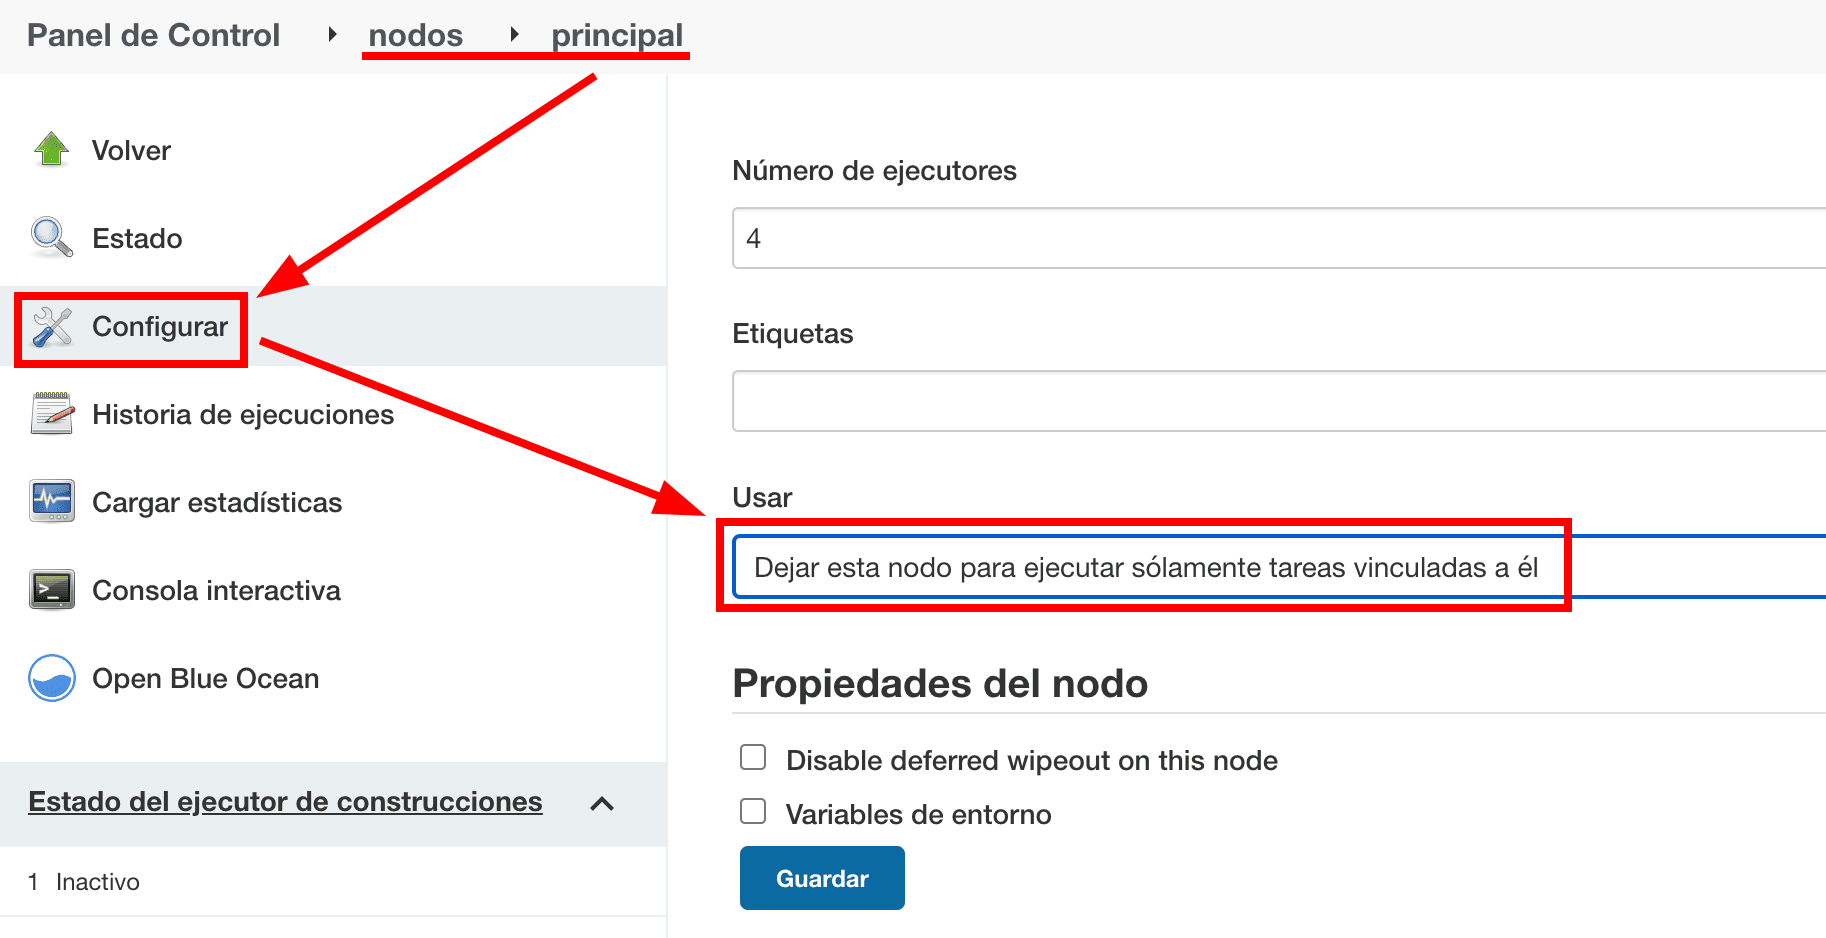
Now that we have our Spot fleet configured, it is time to make some small changes so Jenkins uses this new type of nod. If we want it to be used systematically on a global level, we can disable the execution of tasks on the main node (the only other node in our case) from the node configuration screen.
If, on the other hand, we want certain tasks to be executed in the subordinate nodes, we will have to specify them at Jenkinsfile level, here is an example of how to do it:
#!groovy
pipeline {
//Especificamos agente a nivel de Pipeline
  agent {
    label 'ec2-fleet'
  }

  stages {
        stage('Test') {
          agent {
            dockerfile {
              // Si usamos un agente en concreto, tendremos que volver a especificar la etiqueta
              label 'ec2-fleet'
              filename 'Dockerfile'
              dir 'docker/images/tests'
              args '-u root'
            }
          }
          steps {
            sh 'Hello World'
          }
        }
  }
}
With this last step, we are ready to execute any task on dynamically provisioned nodes within Spot Fleet instances.
From Geko Consulting Cloud, we hope you liked this post and above all that you find it useful, nothing would make us happier.
We invite you to contact us if you need information about the Cloud and DevOps world and keep checking our blog to find other useful publications.