

At Geko, we were asked by one of our clients to provide an automated build pipeline for their unity project, as doing it manually took a lot of time that the developers could spent improving the application instead of generating the executables. First, we analyzed their current and future needs as this would enable us to provide the best solution in the short/long term for them.
Requirement
- Automated process
- 5 main platforms now (iOS, Android, Windows, Linux, WebGL)
- Possibility to build for other platforms in the near future (Nintendo, PlayStation, XBox, Stadia, etc)
- Flexibility to integrate with other services
- Cost efficient
After evaluating the current infrastructure of the company and the pros/cons of using services such as Unity Builder, we decided to develop the building pipelines on Jenkins. By taking this approach we accomplished all the requirements of the task, as Jenkins will allow us to:
- Script the necessary steps to perform an automated build process.
- Generate builds for all the desired targets (5 main platforms and other platforms), currently on Unity Builder it is not possible to work with the extra platforms.
- Achieve cost efficiency by using on-demand workers that would get destroyed after the job ends. Unity Builds uses a similar strategy but the overall cost is a little more expensive.
Now that we have our plan defined let’s get to work and prepare our Jenkinsfile, in this post we make the following assumptions:
- You have a running Jenkins instance and basic understanding of some Jenkins concepts.
- Your worker machine operating system is Windows.
- Your worker machine has Android Studio installed.
- Your worker machine has Unity Hub installed.
- You have a pro or plus Unity License
Building for Android Platform
Setting up Android Studio
Unity leans on Android Studio tools to perform the builds, for that reason is important to have Android Studio installed (you can also install only the SDK) and add the api version you want your built to support.
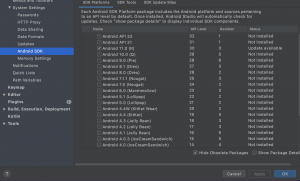
- Open Android Studio settings
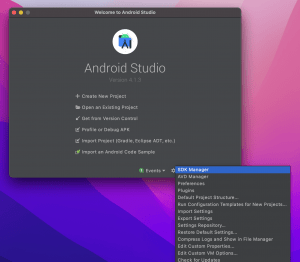
- Add the API versions (Levels) you need your application to support
Setting up Unity Hub
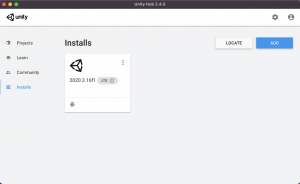
Unity Hub is a unity tool that makes setting your dev environment really easy, here are the steps you need to follow after downloading and installing it:
- Go to the install section on the left panel
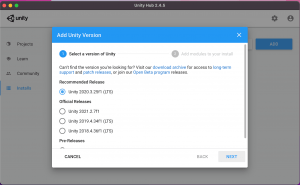
- Haga click ADD and select the recommended version
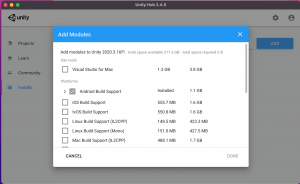
- Once the unity version is installed, click on the 3 dots over the version and select Add Modules
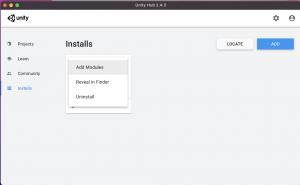
- Install Android Build Support and click Done
Writing the Jenkinsfile
- First we need to create the Jenkinsfile that will contain the steps necessary to generate our build.
pipeline {
    //Definition of env variables that can be used throghout the pipeline job
    environment {
    }
    //Options: add timestamp to job logs and limiting the number of builds to be kept.
    options {
    }
    //Variable inputs that modify the behavior of the job
    parameters {
    }
    //Tag Selector of the agent that will run the build job
    agent {
    }
    //The steps necessary to generate the desired build
    stages {
    }
    //Any action we want to perform after all the steps have succeeded or failed
    post {
    }
}
- Next lets define our environmental variables, config options, build paramaters, build agent and post actions.
pipeline {
    //Definition of env variables that can be used throughout the pipeline job
    environment {
        // Github data
        String gitUrl = "[email protected]:GekoCloud/unity_build_demo.git"
        String gitCredentials = "jenkins-private-key" // set a PrivateKey credential if your repo is private

        // Unity tool installation
        UNITY_EXECUTABLE = "C:\\Path\\To\\Your\\Unity\\Version\20.3.16f1\\Editor\\Unity.exe"

        // Unity data
        UNITY_ID_EMAIL = credentials('jenkins-id-for-unity-email')
        UNITY_ID_PASSWORD = credentials('jenkins-id-for-unity-password')
        UNITY_ID_LICENSE = credentials('jenkins-id-for-unity-license')

        // Unity Build params
        BUILD_NAME = "Android-${currentBuild.number}"
        String buildTarget = "Android"
        String outputFolder = "CurrentBuild"

        //PARAMETERS DATA
        IS_DEVELOPMENT_BUILD = "${params.developmentBuild}"

        // Add other EnvVars here
    }
    //Options: add timestamp to job logs and limiting the number of builds to be kept.
    options {
        timestamps()
        buildDiscarder(logRotator(numToKeepStr: "10"))
    }
    //Variable inputs that modify the behavior of the job
    parameters {
        string(name: 'gitBranch', defaultValue: 'development', description: 'Set the branch.')
        booleanParam(name: 'developmentBuild', defaultValue: true, description: 'Choose the buildType.')
    }
    //Tag Selector of the agent that will run the build job
    agent {
        node {
            // Jenkins node to be used must have the label android
            label "android"
        }
    }
    //The steps necessary to generate the desired build
    stages {
    }
    //Any action we want to perform after all the steps have succeeded or failed
    post {
        success {
            echo "Success :)"
        }
        failure {
            echo "failure :("
        }
    }
}
- Now that we have a basic general structure, lets define the different stages/steps that will allow us to create the desired build for the unity application:
-
- Pull our application code from our source code repository.
   stage('Git Pull') {
        steps {
            echo "Git pull repo"
            script {
                try {
                    git url: "${gitUrl}", branch: "${gitBranch}", credentialsId: "${gitCredentials}"
                } catch (e) {
                    currentBuild.result = "FAILED"
                    echo "JOB FAILED: The selected branch does not exists."
                }
            }
        }
    }
This will download the application code defined in our EnvVars to the current agent machine.
-
- Activate our Unity license on the current builder machine.
   stage('Activate License') {
        steps {
            script {
                echo "Activate License..."
                bat '%UNITY_EXECUTABLE% -nographics -projectPath %CD% -quit -batchmode -username %UNITY_ID_EMAIL% -password %UNITY_ID_PASSWORD% -serial %UNITY_ID_LICENSE%'
            }
        }
    }
In order to perform builds with command-line, Unity requires that a valid pro or plus license is activated on the machine before executing the build commands.
-
- Run the build command.
stage('Build Application') {
        steps {
            script {
                echo "create Application output folder..."
                bat 'mkdir %outputFolder%'

                echo "Buld App..."
                bat '%UNITY_EXECUTABLE% -projectPath %CD% -quit -batchmode -nographics -buildTarget %buildTarget% -customBuildPath %CD%\\%outputFolder%\\ -customBuildName %BUILD_NAME% -executeMethod BuildCommand.PerformBuilds'
            }
        }
    }
The argument -executeMethod BuildCommand.PerformBuilds, allow us to execute functions defined in a C# script (The BuildCommand.cs file must be placed in the Assets/Scripts/Editor folder of your project and you can see an example here: BuildCommand, that will perform the different settings that are usually performed manually on the Unity IDE. For more information about the settings that can be configured visit the unity api doc.
-
-
Deactivate our Unity license on the current builder machine.
-
   post {
        always {
            script {
                echo "Return License..."
                bat '%UNITY_EXECUTABLE% -nographics -quit -batchmode -returnlicense -username %UNITY_ID_EMAIL% -password %UNITY_ID_PASSWORD%'
            }
        }
    }
This is only necessary if running your workloads on efemeral machines, since the unity license is not released automatically when the machine running the job is terminated. Also this is not run as a stage because we need to release the license if the job fails or succeeds.
After your Jenkinsfile is done (you can see the complete file here: Jenkinsfile) and your BuildCommand script is added to your project, you can create a pipeline job on your jenkins instance and point it to your newly created Jenkinsfile. Note: Since this post was meant as guide and not a running demo some changes might need to be done for your specific project.
To summarize, Unity allows the developers to define build settings by providing a very extensive configuration API, while Jenkins enables the devops teams to run this automated builds on CI/CD pipelines, which needless to say can include all sort of extra steps: upload to S3 buckets, monitoring generated build logs, etc. If you are having issues setting up the infrastructure to run your build pipelines, contact us and we might be able to help you with that 😁.